Xmailer
  • Xmailer: The Ultimate Email Marketing Platform
  • CONTACT LIST MANAGEMENT
    • Create a contact list
    • Resubscribe after an unsubscribe
    • List X-Ray
    • View or search your contacts
    • Contact Tags Manager
    • Export your contact list
    • Uploading a suppression list
    • Large suppression files
    • Exclusion Lists
    • GDPR Delete & Export
  • SEGMENTING
    • What you can do with segments
    • Create a segment
    • Designing your segment
    • Tag contacts in a segment
    • Export a Segment's Contacts
    • A/B test using segments
  • BROADCAST
    • What you can do with broadcasts
    • Create a Broadcast
    • Broadcast Settings
    • Choosing your email composer
    • Augment your subject line with a preheader
    • Adding your recipients
    • Schedule your Broadcast
    • Resend to non-openers automation
    • Broadcast Reporting
    • Duplicate a broadcast
    • Tag contacts who Open your broadcast
    • Resume an incomplete broadcast
    • Export Broadcast Openers & Unsubscribes
    • Cancel a broadcast
    • Cancel a broadcast funnel trigger
    • Revise tagging and funnel triggers for sent broadcasts
  • USING THE DRAG & DROP EMAIL COMPOSER
    • The Basics
      • Content Row Properties
      • Designing your email - Using Columns
      • Footer
      • Social Media Component
    • Working with multimedia
      • Adding video to your page
      • Using the image editor
      • Using dynamic images for countdown timers and personalized content
      • Search for free, high-quality stock photos in Xmailer
      • Editing Image Properties
      • Adding GIF animations & animated stickers with GIPHY
      • Adding video to your email
      • Using the File Manager
      • How to use external images in your design
    • Working with content blocks
      • Table Content Block
      • Using Internal Links in Pages
      • Working with paragraph and list content blocks
      • Using dividers and spacers
      • Letter and Paragraph spacing
      • Working with titles
      • Working with menus in Xmailer
      • Working with icons
      • Working with custom HTML
    • Settings, rows, & columns
      • Dark Mode Preview
      • Designing with Workspace Styles
      • Designing with Saved Rows
      • Mobile design mode
      • Co-editing
      • Column management
      • Configuring design settings
      • Settings, Rows, and Content: How do they work?
      • Adding a background image to your designs
      • How do I change the properties of a row?
      • Mobile Optimization Options
      • How do I select a row vs. content?
      • Undo, redo & history
      • Working with padding
      • Working with borders
      • Saving your designs in Xmailer
      • Locking content to prevent editing
  • FUNNELS
    • What you can do with funnels
    • Create a funnel
    • Choosing your funnel type
    • From Name & From Email - editing
    • Activating your funnel
    • Trigger an email funnel from a broadcast
    • Tag contacts who open your funnel messages
    • Choosing your email composer
    • Page Augment your subject line with a preheader
    • Design your automated email sequence
    • Contact Suppression and Exclusion
    • Adding a funnel to an opt-in subscriber form
  • SUBSCRIBER OPT-IN FORMS
    • What you can do with forms
    • Create an opt-in form
    • Sending to double opt-in contacts
    • Choosing your form type: floating bars, lightboxes,inline naked embedded, slide outs
    • Exit intent and display rules
    • Adding email and name input boxes to your form
    • Setting the size of your form
    • Configuring how your form displays on mobile devices
    • Configuring your mobile width
    • Add a close window X to your form
    • Adding a "No" button that closes your form
    • Tag subscribers who opt-in to your form
    • Adding "no thanks" text which closes your form
    • View your form conversion rate
    • Connect an existing form to your account
    • Adding your form to your website
    • Add opt-in subscribers to an automated email sequence
Powered by GitBook
On this page
  • Overview
  • Other Save Methods
  1. USING THE DRAG & DROP EMAIL COMPOSER
  2. Settings, rows, & columns

Co-editing

PreviousMobile design modeNextColumn management

Last updated 1 year ago

This article applies to the Business and Enterprise plans.

Overview

Co-editing allows you to work simultaneously on the same design with your teammates. This feature allows you to see the editors other people are making in real-time. It can also help you collaborate with commenting. Co-editing aims to increase efficiency in your design workflow.

When another member joins you in a co-editing session, avatars appear at the bottom of the page. You'll also see your own avatar, even when editing alone. Each member will have a different color, and the initials of the profile will appear there. This lets you know who else is in the co-editing session.

Every change will be reflected automatically to all the users editing the content.

A co-editing session is limited to 5 users at a time.

If a sixth member tries to join the co-editing session, they will receive a notification. This states, "Maximum number of users reached." The user will need to wait until one of the co-editors has left the editing session before they can join.

How it works with the Commenting feature

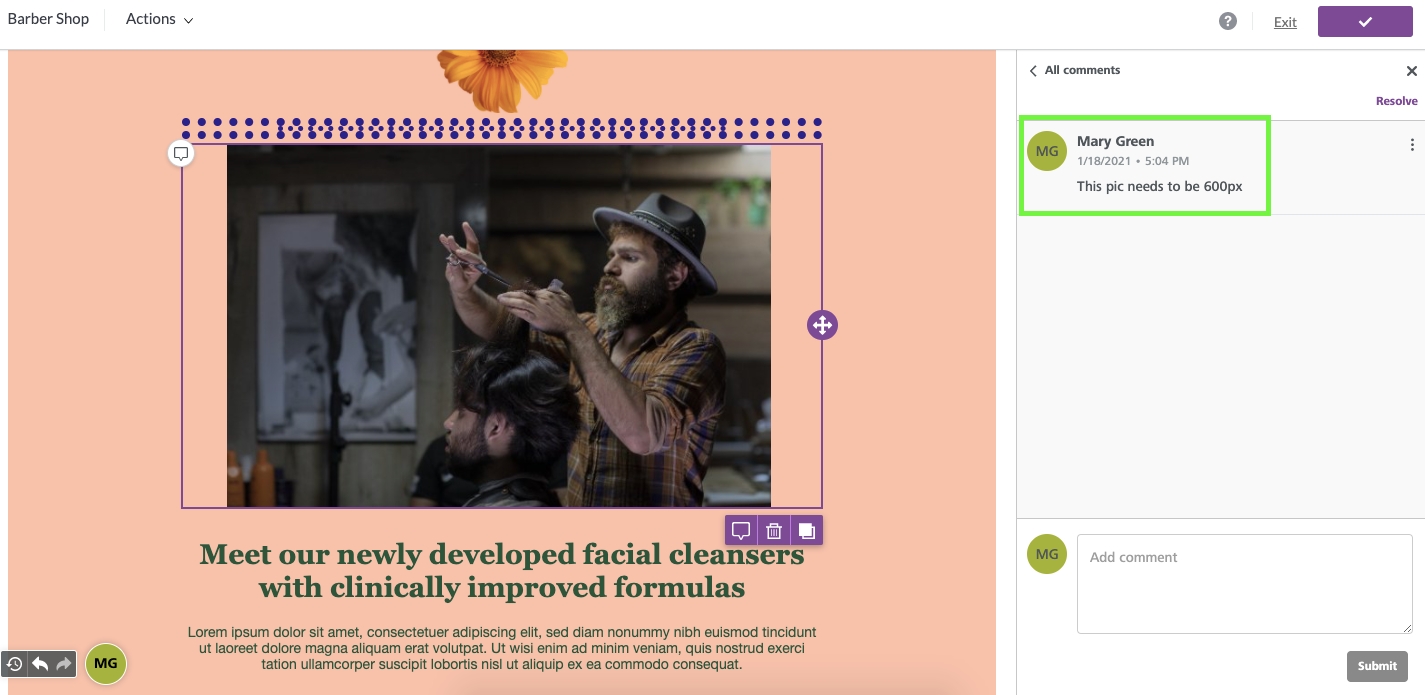
The Commenting feature uses the same avatar colors associated with co-editing icons. You can see an example of this in the screenshot below. Mary Green's avatar is identical in both the commenting box and on the builder stage.

The colors are associated by default, and it's not possible to change them.

Undo and Re-do Features

In co-editing, the undo/redo features are unavailable. This limitation prevents undesired changes to another person's work. When co-editing, the change history also shows you who performed the most recent edits:

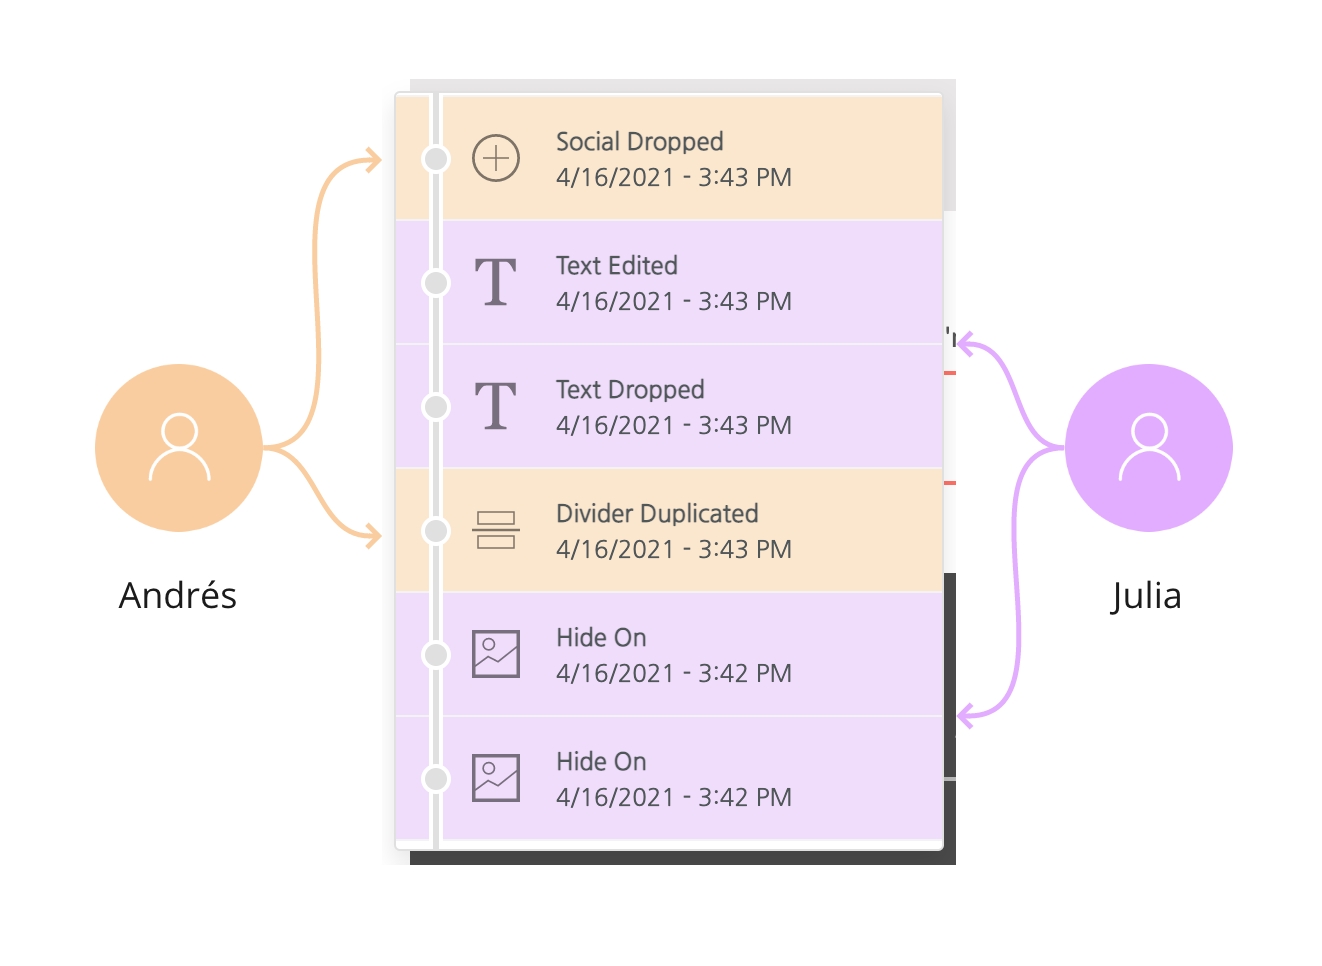
In the standard behavior, Julia will undo Andrés' actions when hitting the Undo arrow. If they are working in different sections of the design, Julia may not be aware of the changes she makes to Andrés' work.

To prevent this, the undo/redo feature is unavailable during a co-editing session. This way, we can guarantee that your changes will not be rolled back by someone else. The undo/redo feature will become available again if users exit and only one user remains in the builder.

Other Save Methods

This section only applies if there is more than one person in the co-editing session. If you are the only person working on the design, thefeatures work as normal.

Are you seeing a different save behavior in the builder? If so, you're probably not logged into your Business or Enterprise account. Our Starter & Professional plans utilize a different save method (autosave without co-editing). It's also possible that you landed on our builder. For more information about other save methods, see .

undo, re-do, and history
Saving your designs in Xmailer